Jul 28, 2025
11min Read
Integrating n8n with Ollama enables you to harness various AI models into your automation workflow, allowing it to perform complex operations that would otherwise be impossible.
However, the process can be tricky because you need to configure various settings on both tools in order for them to work seamlessly.
As long as you already have n8n and Ollama installed on your server, you can integrate them in four simple steps:
- Add the Ollama chat model node
- Choose the AI model and adjust its runtime settings
- Configure the AI agent node’s prompt settings
- Send a test prompt to verify functionality
After completing those steps, you’ll have a functional, Ollama-powered AI processing workflow, which you can integrate into a more complete automation system. For example, you can connect messaging apps like WhatsApp to create a functional AI chatbot.
Moreover, running it locally on a private server like a Hostinger VPS provides you with a higher level of control over your data. This makes the integration suitable for automating tasks involving sensitive information, like summarizing internal documents or creating an in-house chatbot.
Let’s explore how to connect Ollama with n8n in detail and create a chatbot based on this integration. Towards the end, we’ll also explain the popular use cases for this integration and expand its capabilities using the LangChain nodes.
Prerequisites
To integrate n8n with Ollama, you need to fulfill the following prerequisites:
- Ollama must be installed locally. Make sure you’ve installed Ollama locally on a virtual private server (VPS). The host must have enough hardware to run your desired AI models, which might require over 8 GB of RAM.
- n8n must be set up and accessible. Install n8n on a VPS and create an account. It must be configured on the same server as Ollama due to compatibility constraints.
- Ensure the necessary ports are open. Verify that ports 11434 and 5678 on your server are open to ensure Ollama and n8n are accessible. If you host them on Hostinger VPS, check the ports and configure them by simply asking our Kodee AI assistant.
- Basic JSON knowledge. Learn how to read JSON because n8n nodes primarily exchange data in this format. Understanding it helps you select data and troubleshoot errors more efficiently.
Important! We highly recommend installing both n8n and Ollama in the same Docker container for better isolation. This is the method that we used for testing this tutorial, so it is verified to work.
If you use a Hostinger VPS, you can start by installing either n8n or Ollama in a Docker container by simply selecting the corresponding OS template – the application will be installed in a container by default. Then, you’ll need to install the other app in the same container.
How to set up Ollama integration in n8n
Connecting Ollama with n8n involves adding the necessary node and configuring several settings. In this section, we will explain the steps in detail, including how to test the integration’s functionality.
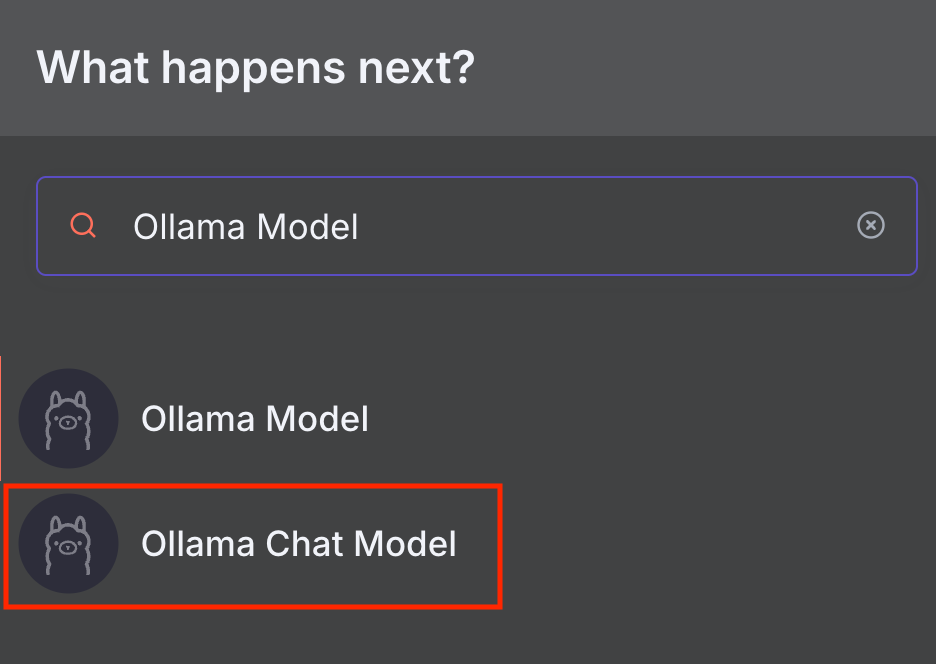
1. Add the Ollama Chat Model node
Adding the Ollama Chat Model node enables n8n to connect with large language models (LLMs) on the AI platform via a conversational agent.
n8n offers two Ollama nodes: Ollama Model and Ollama Chat Model. The Ollama Chat Model is specifically designed for conversation and has a built-in Basic LLM Chain node that forwards your message to the chosen model. Meanwhile, the Ollama Model node is suitable for more general tasks with other Chain nodes – we’ll discuss this further in the LangChain section.
In this tutorial, we’ll use the Ollama Chat Model node as it’s easier to use and integrate with a more complete workflow. Here’s how to add it to n8n:
- Access your n8n instance. You should be able to open it in a web browser using your VPS’s hostname or IP address, depending on your configuration.
- Log in to your n8n account.
- Create a new workflow by clicking the button on the top right of your n8n main page.

- Click the plus icon and search for Ollama Chat Model.
- Add the node by clicking it.
The node configuration window will appear. Let’s proceed to the next step to set it up.
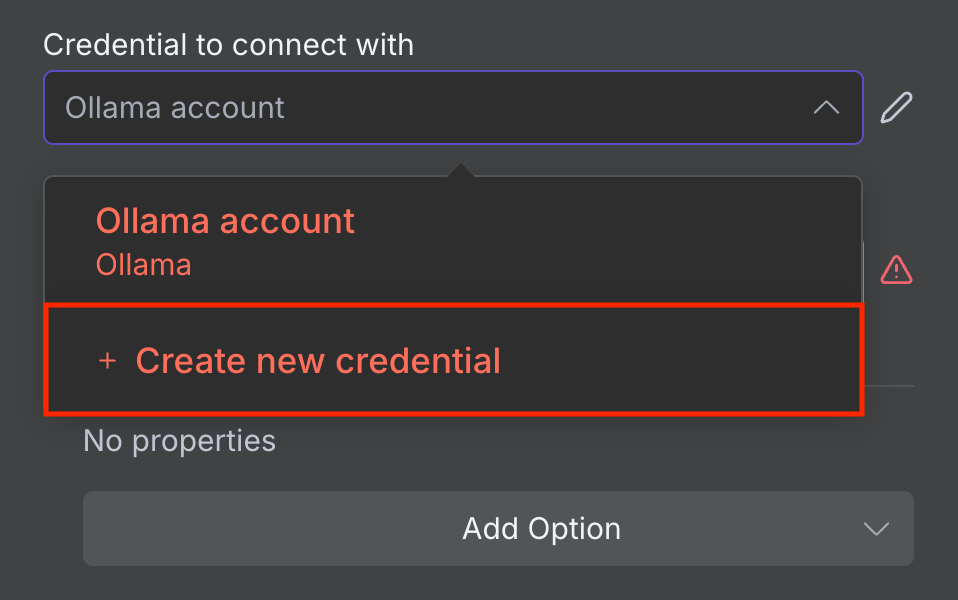
2. Choose your model and runtime settings
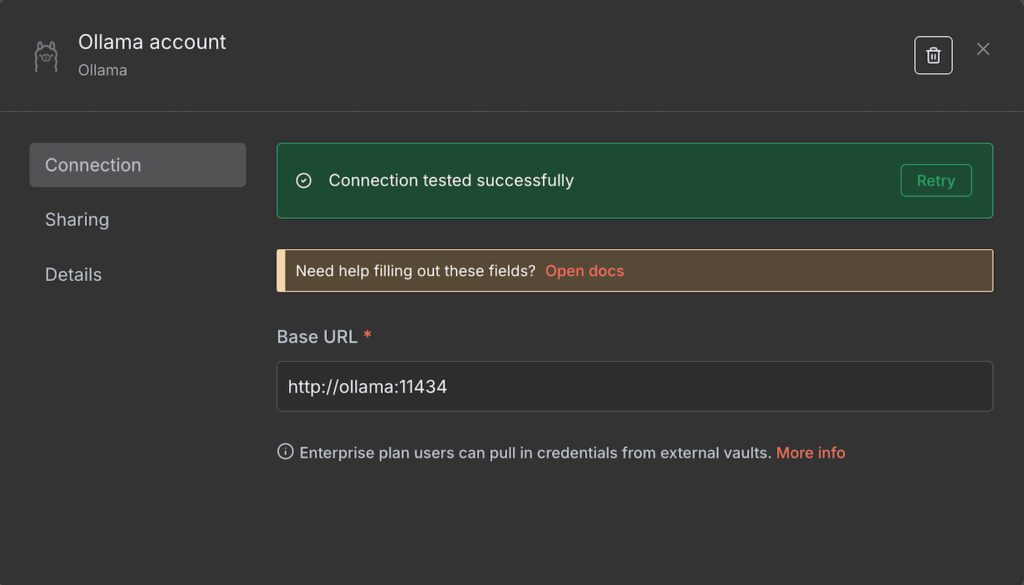
Before choosing an AI model and configuring its runtime settings, connect n8n with your self-hosted Ollama instance. Here’s how to do it:
- On the node configuration window, expand the Credential to connect with drop-down menu.
- Select Create new credential.
- Enter the base URL of your Ollama instance. Depending on your hosting environment, it might be localhost or the name of your Ollama Docker container.
- Hit Save.
If the connection is successful, you’ll see a confirmation message. Otherwise, make sure the address is correct and your Ollama instance is running.
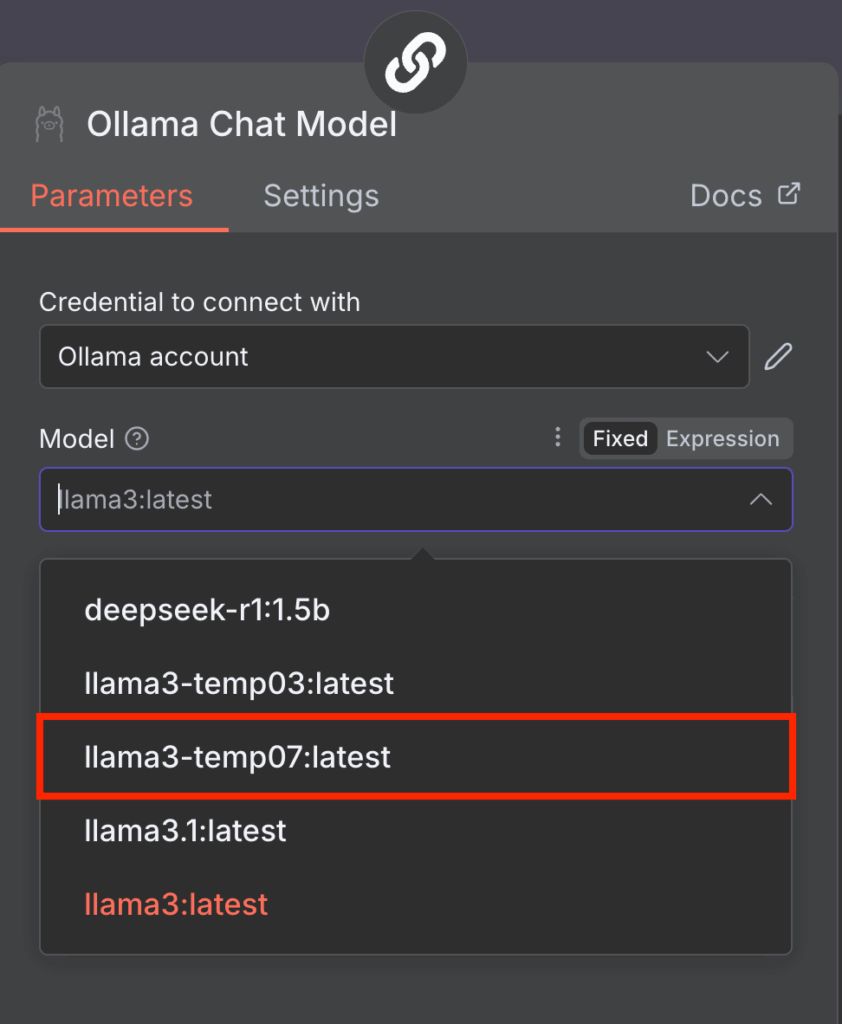
Once connected, you can choose the LLM to use in your Ollama model node. To do so, simply expand the Model drop-down menu and select one from the list. If it is greyed out, refreshing n8n will resolve the issue.
Note that n8n currently only supports older models like Llama 3 and DeepSeek R1. If the Model menu shows an error and an empty list, it is most likely because your Ollama only has incompatible models.
To resolve this, simply download other Ollama models. On Ollama CLI, do this by running the following command in your Ollama environment:
ollama run model-name
You can also use a model with custom runtime settings, such as a higher temperature. Here’s how to create one in Ollama CLI:
- Access your Ollama installation. If you use Docker, use the following command with ollama being your container’s actual name:
docker exec -it ollama bash
- Create a new modelfile defining your model’s runtime setting. For example, we’ll set the temperature of our Llama 3 model to 0.7:
echo "FROM llama3" > Modelfile
echo "PARAMETER temperature 0.7" >> Modelfile
- Run the following command to apply the modelfile configuration to the base Llama 3 model, creating a custom LLM called llama3-temp07:
ollama create llama3-temp07 -f Modelfile
Once you’ve completed these steps, n8n should read your new Llama 3 model with the custom 0.7 temperature.
Managing Ollama GUI
If you use Ollama GUI, check out our tutorial to learn more about its interface and how to manage your models.
3. Configure prompt settings
Configuring prompt settings enables you to customize how the Basic LLM Chain node modifies your input before passing it to Ollama for processing. While you can use the default settings, you should change them depending on your tasks.
Here are two ways you can modify the LLM chain node’s prompt settings and their example use cases.
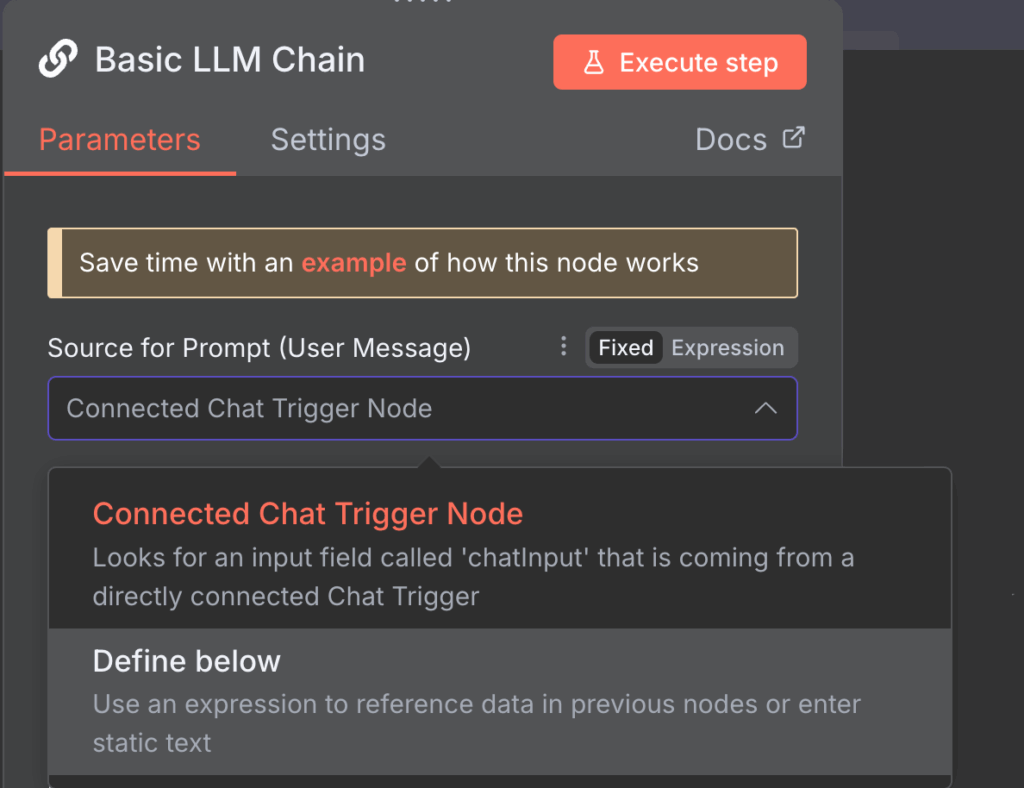
Connected Chat trigger node
The Connected Chat trigger node option uses messages from the default Chat node as input for Ollama. It is the chosen mode by default and passes messages as they are.
However, you can include additional prompts along with the messages to modify Ollama’s output. To do this, click the Add Prompt button in the Chat Messages (if Using a Chat Model) setting and choose from three additional prompt options:
- AI. Enter an example of the expected response in the Message field. The AI model will try to respond in the same way as the provided text.
- System. Write a message that guides the model’s responses. For example, you can define the tone the AI will use or the words it should avoid when responding.
- User. Add a sample of the user input for the AI, such as a message, URL, or image. Giving the AI a sample of what to expect from users will allow it to return more consistent responses.
Define below
The Define below option is suitable if you want to enter a reusable pre-typed prompt. It is also ideal for forwarding dynamic data because you can capture it using Expressions – a JavaScript library that manipulates the input or selects a specific field.
For example, the previous node fetches data about your VPS resource usage, and you want to analyze it using AI. In this case, the prompt remains the same, but the usage metrics will continually change.
Your prompt might look like the following, with {{ $json.metric }} being the field containing dynamic data about your server resource usage:
The latest usage of my server is {{ $json.metric }}. Analyze this data and compare it with the previous usage history to check if this is abnormal.
Note that you can still add additional prompts like the previous mode to give the AI more context.
4. Send a test prompt
Sending a test prompt verifies that your Ollama model works properly when receiving input via n8n. The easiest way to do this is by entering a sample message via these steps:
- Save your workflow by clicking the button on the top right of your canvas.
- Hover over the Chat trigger node and click Open chat.
- On the Chat interface, send a test message.
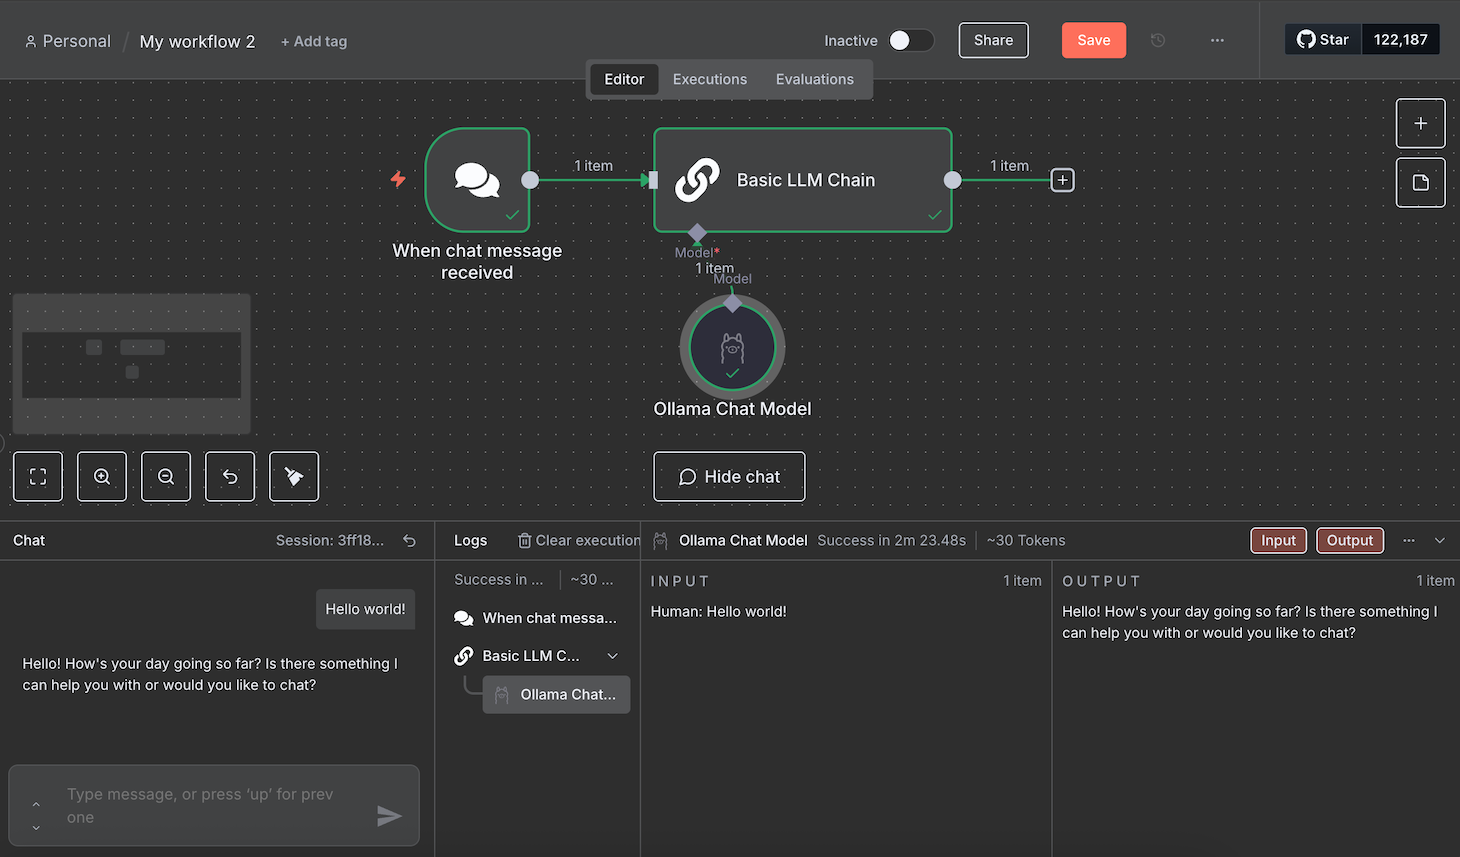
Wait until the workflow finishes processing your message. During our testing, the workflow got stuck a few times. If you encounter the same issue, simply reload n8n and send a new message.
If the test is successful, all the nodes will turn green. You can read each node’s JSON input and output by double-clicking it and checking the panes on both sides of the configuration window.
How to create a chatbot workflow using Ollama and n8n
Integrating Ollama into n8n enables you to automate various tasks with LLMs, including creating an AI-powered workflow that responds to user queries, like a chatbot. This section will explore the steps for developing one.
If you want to create an automation system for other tasks, check our n8n workflow examples for inspiration.
1. Add a trigger node
The trigger node in n8n defines the event that will start your workflow. Among several options, here are the most common ones for creating a chatbot:
Chat trigger
By default, the Ollama chat model node uses Chat message as the trigger, which initiates your workflow upon receiving a message.
This default Chat node is perfect for developing a chatbot. To get it working, all you need to do is make the chat interface available to the public.
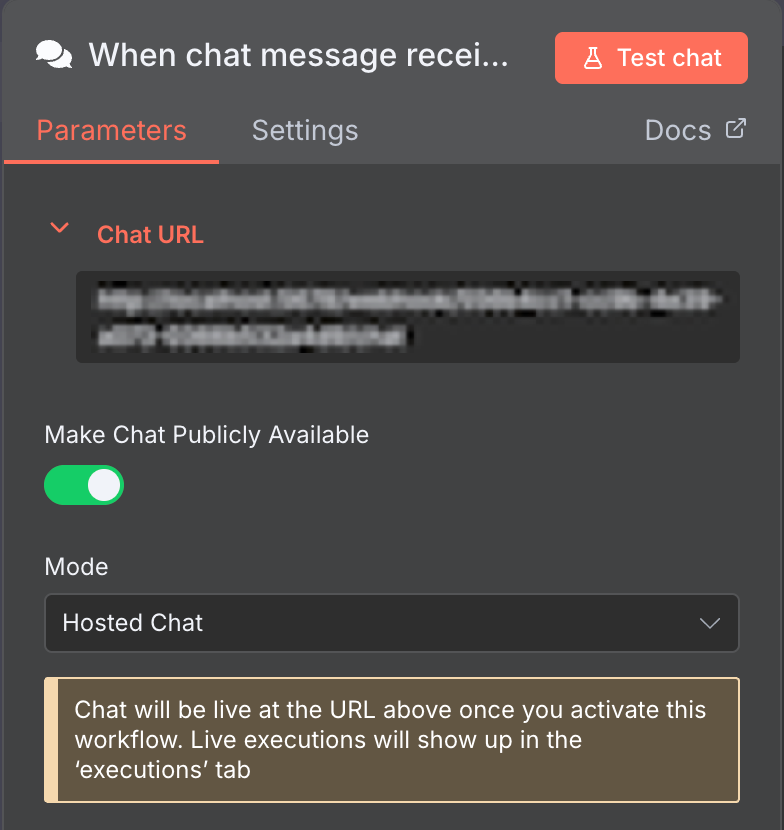
To do this, open the Chat node and click the Make Chat Publicly Available toggle. You can then embed this chat functionality into your custom chatbot with a user interface.
Messaging app trigger nodes
n8n has trigger nodes that take input from popular messaging apps like Telegram and WhatsApp. They are suitable if you want to create a bot for such applications.
Configuring these nodes is rather tricky because you need a developer account and authentication keys to connect to their APIs. Refer to their documentation to learn more about how to configure them.
Webhook trigger
The Webhook trigger starts your workflow when its endpoint URL receives an HTTP request. This is suitable if you want to start your chatbot using events other than sending a message, like a click.
In the steps below, we’ll use this node to start our workflow whenever a Discord chatbot receives a message. If you wish to follow along, first check out our integrating n8n with Discord tutorial to learn how to create a Discord bot.
Important! If your webhook URL starts with localhost, change it to your VPS’ domain, hostname, or IP address. You can do this by modifying n8n’s WEBHOOK_URL environment variable inside its configuration file.
2. Connect the Ollama node
Connecting the Ollama node allows the trigger node to forward user input for processing.
The Ollama Chat Model node doesn’t connect directly to trigger nodes and only integrates with an AI node. The default one is the Basic LLM Chain node, but you can also use other Chain nodes for more complex processing.
Some Chain nodes support additional tools for processing your data. For example, the AI Agent node lets you add a parser to reformat the output or include a memory to store the previous responses.
For a chatbot that doesn’t require complex data processing, like our Discord chatbot, the Basic LLM Chain is enough.
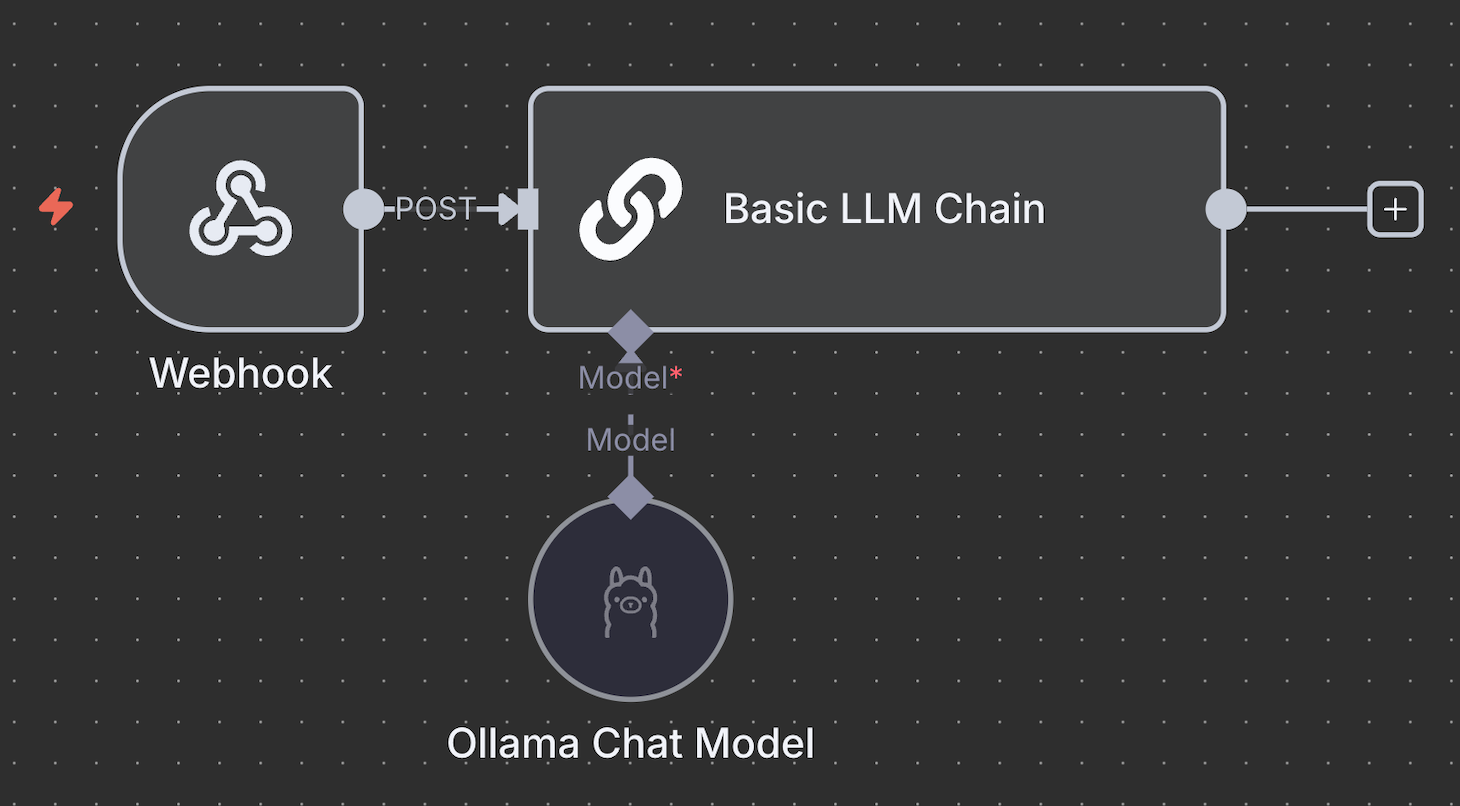
So, connect the trigger node with the Basic LLM Chain node and define how to pass the input. Use Fixed to pass the message as the prompt. Meanwhile, select Expression to use dynamic data or manipulate the input before forwarding it to Ollama.
For example, we use the following Expression to choose the body.content JSON field as the input, which changes depending on users’ Discord messages:
{{ $json.body.content }}
3. Output the response
Outputting the response from the AI Agent or Basic LLM Chain node makes it possible for users to see the response from your bot. At this point, you can only read the output from the chat interface or the node’s output pane.
To send the response, use the same node as your trigger. For example, if you are developing a WhatsApp chatbot, connect the WhatsApp send message node.
If you use the default Chat trigger, you can use the Webhook node to forward the message to your custom-coded bot or chatbot interface.
Since our Discord bot’s workflow uses the Webhook trigger, we can also use the Webhook node for the output. Alternatively, we can use the same bot to send the answer by connecting the Discord Send a Message node and integrating it with our chatbot. The completed workflow will look like this:

Not sure how to create a complete workflow
n8n provides various ready-to-use workflows that you can easily import to your canvas. This enables you to create an AI-powered automation system without developing the workflow from scratch.
Check out our best n8n templates tutorial to discover curated, ready-to-use workflows for various purposes.
What are the best use cases for n8n Ollama integration?
Being one of the most powerful AI automation tools, n8n’s integration with Ollama’s customizable LLMs enables you to automate a wide range of tasks.
Here are examples of tasks you can automate with n8n and AI:
- Automated customer support workflow. Use Ollama’s LLMs to generate replies to customer queries, summarize tickets, or route issues on platforms like Zendesk and Intercom, all via n8n.
- Context-aware email drafting. Automatically draft emails for different contexts or tasks using Ollama. For example, you can write a message to onboard a new lead, remind customers about subscription expiration, and announce product updates using different events.
- Internal knowledge base assistant. Use n8n to query internal documentation, like Notion, Confluence, or Airtable, and feed the data into Ollama to generate intelligent answers or summaries for internal team queries.
- Data extraction and summarization. Use n8n to watch incoming text documents, extract their text, and extract key information with Ollama – useful for summarizing reports, invoices, or legal documents.
- Automated content production pipeline. Generate content using n8n and Ollama by creating a workflow that automates the keyword research, writing, and editing process.
- Secure chatbots for internal use. Create in-house chatbots that work with sensitive internal data, where n8n handles the orchestration, and Ollama runs the LLM completely offline for security and privacy.
Why should you host your n8n-Ollama workflows with Hostinger?
Hosting your n8n-Ollama workflows with Hostinger brings various advantages over using a personal machine or the official hosting plan. Here are some of the benefits:
- Higher control. Hostinger’s n8n VPS hosting service provides users full root access to their server settings and data. This enables you to configure your n8n and Ollama hosting environments to your specific preferences.
- Improved privacy. Since you’ll be hosting n8n and Ollama on a server over which you have complete control, you’ll have the freedom to fine-tune access limits and security settings.
- Scalability. Hostinger VPS plans are easily upgradable without downtime and offer the n8n queue mode template that enables you to offload your task to multiple workers.
- Streamlined setup. Our VPS templates enable you to install n8n or Ollama in one click, making the process more efficient.
- Easy management. Managing a Hostinger VPS is easy with the intuitive hPanel control panel or the built-in browser terminal. Beginners can also ask our AI assistant, Kodee, to perform system administration tasks via chat.
Using LangChain’s LM Ollama node in n8n
LangChain is a framework that facilitates the integration of LLMs into applications. In n8n, this implementation involves connecting different tool nodes and AI models to achieve particular processing capabilities.
In n8n, the LangChain feature uses Cluster nodes – a group of interconnected nodes that work together to provide functionality in your workflow.
Cluster nodes consist of two parts: root nodes that define the main functionality, and sub-nodes that add the LLM capability or extra features.
The most important part of LangChain implementation in n8n is the Chain inside the root nodes. It brings together and sets up the logic for different AI components, like the Ollama model and the parser node, to create a cohesive system.
Here are the Chains in n8n and their functions:
- Basic LLM Chain. Enables you to set the prompt that the AI model will use and an optional parser to reformat the response.
- Retrieval Q&A Chain. Allows you to retrieve AI-processed data using vector stores, databases designed to store information in numerical format.
- Summarization Chain. Summarizes the content of multiple documents or inputs.
- Sentiment Analysis. Analyzes the sentiment of the input text and classifies it into categories like positive, neutral, and negative.
- Text Classifier. Sorts input data into different user-made categories based on the specified criteria and parameters.
When creating a workflow in n8n, you may also encounter Agents – subsets of Chains with the ability to make decisions. While Chains operate based on a set of predetermined rules, Agent uses the connected LLM to determine the next actions to take.
What’s next after connecting n8n with Ollama?
As automation trends continue to evolve, implementing an automatic data processing system will help you stay ahead of the competition. Coupled with AI, you can create a system that takes your project development and management to the next level.
Integrating Ollama into your n8n workflow brings AI-powered automation beyond the built-in node’s capabilities – and Ollama’s compatibility with various LLMs enables you to choose and tailor different AI models to best suit your needs.
Understanding how to connect Ollama into n8n is only the first step in implementing AI-powered automation into your project. Given the sheer number of possible use cases, the next step is to experiment and develop a workflow that best fits your project.
If it’s your first time working with n8n or Ollama, Hostinger is the place to start. Aside from feature-packed VPS plans, we have a comprehensive catalog of tutorials about n8n that will help you start your automation journey.
All of the tutorial content on this website is subject to
Hostinger’s rigorous editorial standards and values.

Aris is a Content Writer specializing in Linux and WordPress development. He has a passion for networking, front-end web development, and server administration. By combining his IT and writing experience, Aris creates content that helps people easily understand complex technical topics to start their online journey. Follow him on LinkedIn.