stress-ng, an extended version of stress, goes beyond the basic functionalities of its predecessor.
To install stress on Linux, use the following appropriate command for your specific Linux distribution.
As recommended, these tools should be used with superuser privileges due to their significant impact on system resources.
- Fine-tune system activities and optimize configurations.
- Monitor operating system kernel interfaces under load.
- Test Linux hardware components such as CPU, memory, disk devices, and more to observe their performance under stress.
- Measure different power-consuming loads and their impact on the system.
Linux Stress Testing Tools: stress and stress-ng
Understanding how your systems perform under stress helps you make informed decisions about capacity planning, hardware upgrades, and system optimization.
stress Tool
uptime
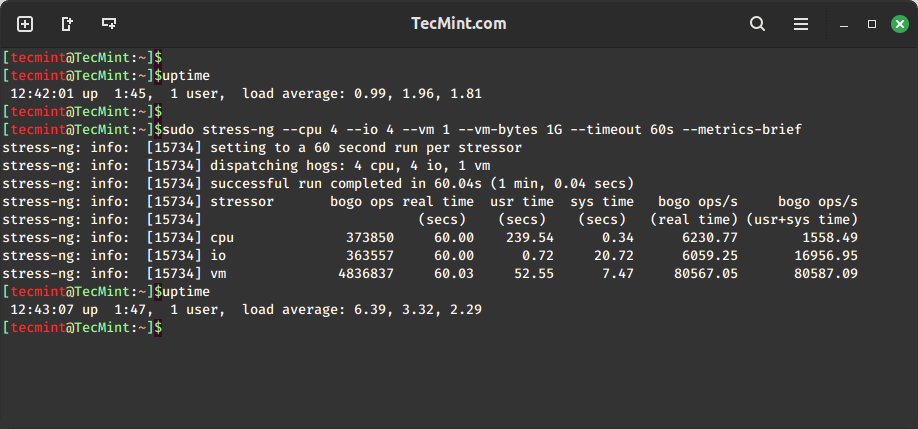
sudo stress-ng –cpu 4 –io 4 –vm 1 –vm-bytes 1G –timeout 60s –metrics-brief
uptime
Real-World Use Cases for Stress Testing in Linux
uptime
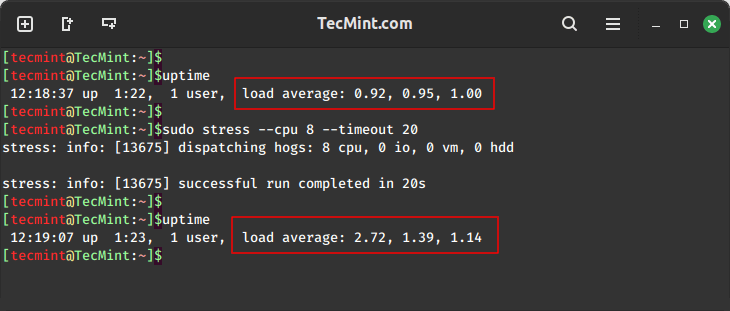
sudo stress –cpu 8 –timeout 20
uptime
2. CPU Stress Test with Verbose Output
sudo stress-ng –cpu 0 –vm 2 –vm-bytes 80% –timeout 10m –metrics-brief
uptime
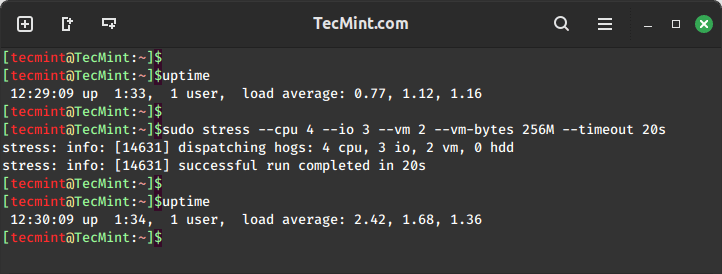
sudo stress –cpu 4 –io 3 –vm 2 –vm-bytes 256M –timeout 20s
uptime
How to Install ‘stress-ng’ Tool in Linux
Simulate production workload patterns to test system stability before deploying new applications:
How to Install ‘stress’ Tool in Linux
uptime
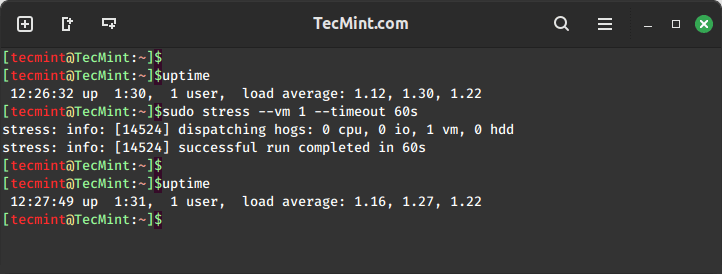
sudo stress –vm 1 –timeout 60s
uptime
4. Combined Stress Test (CPU, I/O, and Memory)
It provides a wider range of stress tests, covering not only CPU, memory, I/O, and disk stress but also incorporating additional tests for things like inter-process communication, sockets, and various file operations.
sudo apt install stress-ng [On Debian, Ubuntu and Mint]
sudo yum install stress-ng [On RHEL/CentOS/Fedora and Rocky/AlmaLinux]
sudo emerge -a sys-apps/stress-ng [On Gentoo Linux]
sudo apk add stress-ng [On Alpine Linux]
sudo pacman -S stress-ng [On Arch Linux]
sudo zypper install stress-ng [On OpenSUSE]
sudo pkg install stress-ng [On FreeBSD]
uptime
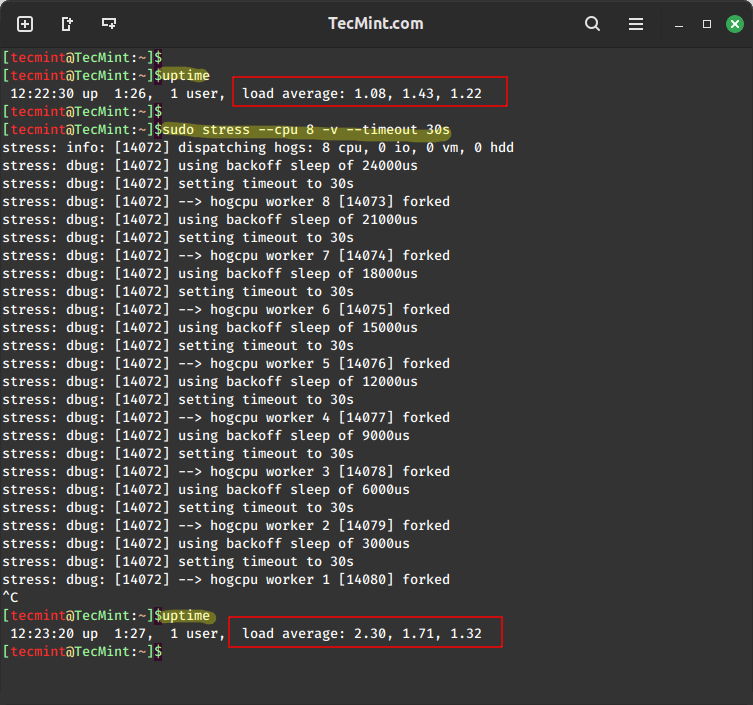
sudo stress –cpu 8 -v –timeout 30s
uptime
3. Virtual Memory Stress Test
Both stress and stress-ng contribute significantly to the proactive management of Linux systems, enabling administrators and programmers to optimize system configurations, identify potential issues, and enhance overall system reliability.
sudo apt install stress [On Debian, Ubuntu and Mint]
sudo yum install stress [On RHEL/CentOS/Fedora and Rocky/AlmaLinux]
sudo emerge -a sys-apps/stress [On Gentoo Linux]
sudo apk add stress [On Alpine Linux]
sudo pacman -S stress [On Arch Linux]
sudo zypper install stress [On OpenSUSE]
sudo pkg install stress [On FreeBSD]
uptime
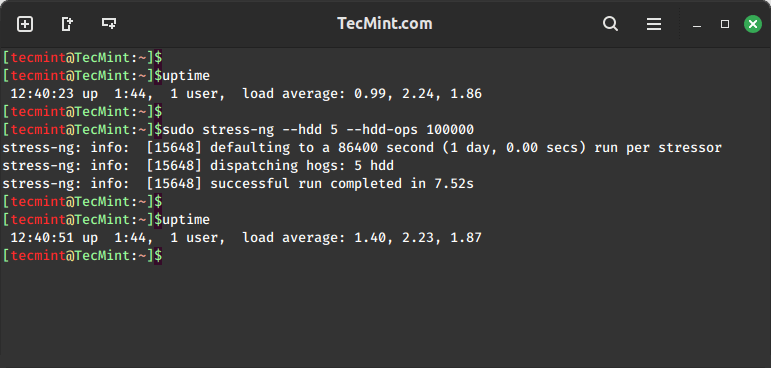
sudo stress-ng –hdd 5 –hdd-ops 100000
uptime
4. Combined Stress Test (CPU, I/O, and Virtual Memory)
After upgrading RAM, CPU, or storage, verify that the new hardware is functioning correctly:
sudo stress-ng –cpu 4 –cpu-load 75 –vm 2 –vm-bytes 2G –timeout 30m
stress is a simple yet powerful tool designed to impose a configurable amount of CPU, memory, I/O, or disk stress on a Linux system and, by simulating heavy workloads, allows administrators to observe how the system responds under pressure.
sudo stress-ng –cpu 0 –io 4 –hdd 2 –timeout 5m –verify
Next, run the stress command to spawn 8 workers spinning on sqrt() with a timeout of 20 seconds. After running stress, check the uptime again and compare the load average.
- To start
Ninstances of each stress test, use the--all Noption as follows. - To start
Nprocesses to exercise the CPU by sequentially working through all the different CPU stress testing methods, use the--cpu Noption as follows. - To use a given CPU stress testing method, use the
--cpu-methodoption. There are many methods available that you can use, to view the manpage to see all the methods to use. - To stop the CPU stress process after
Nbogo operations, use the--cpu-ops Noption. - To start
N I/Ostress testing processes, use the--io Noption. - To stop io stress processes after
Nbogo operations, use the--io-ops Noption. - To start
Nvm stress testing processes, use the--vm Noption. - To specify the amount of memory per vm process, use the
--vm-bytes Noption. - To stop vm stress processes after
Nbogo operations, use--vm-ops Noptions - Use the
--hdd Noption to startNharddisk exercising processes. - To stop hdd stress processes after
Nbogo operations, use the--hdd-ops Noption. - You can set a timeout after
Nseconds by using the--timeout Noption. - To generate a summary report after bogo operations, you can use
--metricsor--metrics-briefoptions. The--metrics-briefdisplays non-zero metrics. - You can also start
Nprocesses that will create and remove directories using mkdir and rmdir by using the--dir Noption. - To stop directory operations processes use
--dir-ops Noptions. - To start
N CPUconsuming processes that will exercise the present nice levels, include the--nice Noption. When using this option, every iteration will fork off a child process that runs through all the different nice levels running a busy loop for 0.1 seconds per level, and then exits. - To stop nice loops, use the
--nice-ops Noption as follows. - To start
Nprocesses that change the file mode bits via chmod(2) and fchmod(2) on the same file, use the--chmod Noption. Remember the greater the value for N then the more contention on the file. The stressor will work through all the combinations of mode bits that you specify with chmod(2). - You can stop chmod operations by the
--chmod-ops Noption. - You can use the
-voption to display more information about ongoing operations. - Use
-hto view help forstress-ng.
How to Use ‘stress-ng’ on Linux Systems
sudo stress option argument
Both stress and stress-ng are excellent tools for general System Administration tasks in Linux environments.
The following are a few stress-ng test example commands to get started:
As a System Administrator, examining and monitoring how your Linux systems perform under heavy workloads is crucial for maintaining optimal performance and reliability.
uptime
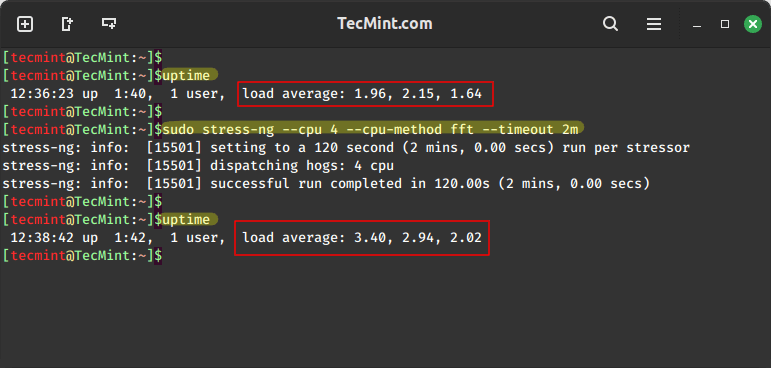
sudo stress-ng –cpu 4 –cpu-method fft –timeout 2m
uptime
3. Hard Drive Stress Test
Stress testing provides System Administrators and Programmers with valuable insights to:
1. Load Testing Before New Server Deployment
stress and stress-ng are essential tools for assessing and testing the performance of Linux systems under various conditions.
uptime
sudo stress-ng –cpu 8 –timeout 60 –metrics-brief
uptime

2. Specific CPU Method Test (FFT)
To examine the effect of stress testing, first run the uptime command to note the load average.
Before putting a new server into production, run comprehensive stress tests to ensure it can handle expected workloads, which will help you identify hardware issues early:
3. Reproducing Production Load
Here are a few example commands to get started with stress:
In this guide, we will explore two important tools, stress and stress-ng, for conducting comprehensive stress tests on your Linux systems.
Summary
I hope this guide was useful. If you have any additional ideas on how to test the health status of your system using these tools or any other stress testing utilities, feel free to share your thoughts in the comments below.
To run 8 CPU stressors with a timeout of 60 seconds and a summary at the end of operations.
sudo stress-ng option argument
This tool is valuable for identifying potential weaknesses and ensuring that the system can handle demanding tasks without compromising performance.