Once everything’s clean, restart the NetworkManager to bring up the interfaces again.
Ethernet Channel Bonding is a useful and straightforward tool for improving both network performance and reliability on your Linux systems. Whether you need to balance traffic across multiple network interfaces or ensure redundancy in case of NIC failure, bonding allows you to get the most out of your hardware.
What Is Ethernet Channel Bonding?
DEVICE=bond0
TYPE=Bond
ONBOOT=yes
BOOTPROTO=static
IPADDR=192.168.1.100
NETMASK=255.255.255.0
BONDING_OPTS=”mode=0 miimon=100″
If you’ve got two or more network interface cards (NICs) and you’re wondering if you can use them together to increase speed or make your network connection more reliable, you’re in the right place.
- Redundancy: If one NIC goes down (gets unplugged or fails), your server keeps running using the other one.
- Load Balancing: Traffic gets shared between both NICs, which can improve performance in some cases.
- Single IP: Even though you have two NICs, you only need one IP address for the bonded interface.
Now open and edit the ifcfg-eth1 file with the following configuration.
Bonding Modes Overview
Here’s how a standalone ifcfg-eth1 file should look:
- You’re on a Red Hat-based system (like RHEL, Alma Linux, Rocky Linux).
- You have root access or sudo privileges.
- You have two NICs:
eth1andeth2. - Your system is using network-scripts or NetworkManager.
Alright, so far, you’ve told Linux that eth1 and eth2 should act as slaves, but slaves need a master, right? That master is what we’re creating here: a bonded interface named bond0.
Step 1: Load the Bonding Kernel Module
sudo ifconfig eth1 down
# eth2 should automatically become active
watch -n 1 cat /proc/net/bonding/bond0
There are about 6 bonding modes in Linux, but for now, we’ll only look at the two most common and practical ones:
DEVICE=eth1
TYPE=Ethernet
ONBOOT=yes
BOOTPROTO=none
MASTER=bond0
SLAVE=yes
By following the steps in this guide, you should now be able to configure bonding easily using two NICs and choose between Load Balancing or Active-Backup modes based on your needs.
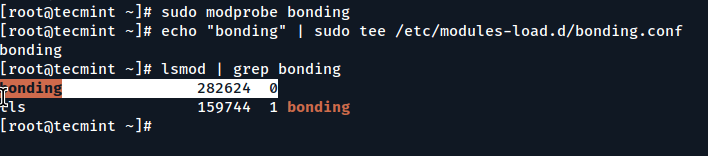
Before Linux can combine two or more network cards (NICs), it needs to load a special piece of software called the bonding kernel module.
sudo modprobe bonding
BONDING_OPTS=”mode=1 miimon=100″
lsmod | grep bonding
Step 2: Configure eth1 and eth2 for Bonding
sudo systemctl stop NetworkManager
sudo ip link set bond0 down
sudo modprobe -r bonding
Sometimes you might want to remove bonding and go back to using your NICs individually, maybe for testing, troubleshooting, or because you’re reconfiguring the server.
We do this by creating or editing configuration files for each interface.
sudo systemctl restart NetworkManager
This setup is often used on servers, production systems, or network appliances where uptime and performance are critical.
DEVICE=eth2
TYPE=Ethernet
ONBOOT=yes
BOOTPROTO=none
MASTER=bond0
SLAVE=yes
Here’s what you get out of it:
For Load Balancing (mode 0) – Create a config file ifcfg-bond0.
Bonding Mode: load balancing (round-robin)
Slave Interface: eth1
Slave Interface: eth2
MII Status: up
watch -n 1 cat /proc/net/bonding/bond0
sudo systemctl start NetworkManager
Before we start, make sure:
(If you’re on Ubuntu/Debian – bonding is done via Netplan.
vi /etc/sysconfig/network-scripts/ifcfg-bond0
Bonding Mode: fault-tolerance (active-backup)
Currently Active Slave: eth1
Slave Interface: eth2
echo “bonding” | sudo tee /etc/modules-load.d/bonding.conf
sudo ifconfig eth1 up
This guide explains Ethernet Channel Bonding (also called NIC teaming or interface bonding) – how to set it up, how it works, and how it can help you balance traffic or prevent network downtime.
In simple terms, Ethernet Channel Bonding lets you combine multiple physical NICs into one single virtual NIC (bond0), which is a virtual interface that handles the network traffic and talks to the physical interfaces (like eth1 and eth2) behind the scenes.
By default, most Linux systems have this bonding module available, but it’s not automatically loaded unless you tell it to load.
ip addr
DEVICE=eth1
TYPE=Ethernet
ONBOOT=yes
BOOTPROTO=static
IPADDR=192.168.1.101
NETMASK=255.255.255.0
DEVICE=eth1
TYPE=Ethernet
ONBOOT=yes
BOOTPROTO=dhcp
Want to test what happens when one NIC goes down?
sudo systemctl restart network
Step 4: Verify Bonding Status
Once you’ve configured your bonding setup and restarted your network service, you’ll want to verify that the bond is working correctly.